Don't forget to visit my Etsy shop to see more of my work!
Showing posts with label Ideas to Inspire. Show all posts

Tuesday, May 10, 2016

Scrap Your Stash Using Kiwi Lane Designs!

If you're anything like me, you have approximately 245,000 sheets of scrapbooking paper in your stash, give or take a few sheets. Well, it seems like that many. And most of it is old. Really old. My goal lately has been to use up those partial collections that I have left in my stash. But every once in a while, I come across a full collection that I had been hanging onto. Such as the "Laurel" collection from Scenic Route. The collection was released in 2006 and I'm almost positive I bought it as soon as it came out. Which means it's been in my stash for about 10 years. It's about time it saw some action, right? Well, here's the photo-ready layout I made using my Kiwi Lane templates:


Along with the older paper, I also used brads from My Mind's Eye collections that were released at least 3 years ago, Doodlebug paper frills that are at least 9 years old, and Bazzill flowers that I've had for at least 8 years. Wow. I'm more of a supply hoarder than I thought!!

It's fun to buy new stuff, and I'd never ask you to give up the joy of shopping for new paper, but remember what you already have and use your Kiwi Lane Designs templates to breathe new life into your old paper!

Templates I used:
Abbie Road 3A,3B
Scallops 1A,1B
Madison Avenue 2A,2B
Tiny Wildflowers 1T,4T
Nature 1
Tiny Nature 1T
Tiny Brackets 4T
Wacky 2
12" Strips
Photos

**Love this layout? You can own it! Head over to my Etsy shop to purchase it- but hurry! It's one of a kind and won't last long!**

Wednesday, February 10, 2016

Valentine's Day Decor with Kiwi Lane Designs

Hey there Kiwi Lane Peeps!

Today I've veered from my normal paper crafting and ventured into the land of wood blocks! Ok, so it's not so unusual, but I don't usually share it here. But I loved how they turned out, and I thought you might like to see it. Here's what I made with the help of my templates from Kiwi Lane Designs:

Pretty cute, huh? All I did was paint some wooden hearts, cover with paper, add some template shapes and finish off with some epoxy dots of various colors and sizes. It's really pretty self explanatory, so I'll let the photos speak for themselves. Mostly.

Here's what I started with:

The paper collection I used is called "Kiss Kiss" and it was Crate Paper's Valentine line a few years ago. The hearts are cut out wood shapes that I picked up at the farmer's market over the summer. They're about 4.5" tall and 4.5" wide and just under 1.5" thick. Before I painted, I made sure I sanded them lightly and wiped off any sanding residue. You'll get a cleaner paint application if you remember to do that.

I also want to point out that I framed my project right on the wood shapes. Who says you can only use your Kiwi Lane templates to frame on your paper?! And just like when you design on your pages or cards, you can change things as you go without ruining pretty paper in the process!

I love the size and configuration of these hearts because you can mix it up when you display them:


And I covered the back with paper so it's pretty from the other side, too.

Looking at the bare paper on the back, I'm thinking I need to go back and add some more layers...

Thanks for taking a look! Leave a comment and let me know what you think!

Templates used:
Tiny Sweetheart 2T,3T
Tiny Explore 3T,6T
Mini Abbie Road 3A,3B
Elements 2,7

Friday, November 6, 2015

A Layout and a Few Cards with Kiwi Lane

Hello fellow Kiwi Lane fans!  I have a few things to share with you today. And to continue with my theme from some of the last few posts I've done, I used another fabulous Kiwi Lane paper kit to create a single page layout and a few cards, along with this month featured templates- Brackets, Adorn and Autumn.

I used Kiwi Lane's "Social Butterfly" paper kit this month. I have to admit- when I saw this collection, I thought it was going to be way too girly for me to do use very well.  Especially with the Autumn template set.  I mean, it has pink, flowers and butterflies!  BUT, I should have known better!! These Kiwi Lane ladies are genius and know how to make a paper kit so that you don't have to use the girly elements in a way that overpowers the page. Instead, you use the reverse side and smaller pieces of those prints that scream GIRLY GIRL.  And you end up with a project that is just feminine enough without jumping out at you with a tiara, tutu and sparkly wand. I'm telling you, it's pure genius!!

So here's the layout I ended up with:
Supplies: Kiwi Lane's Social Butterfly paper kit; alphabet stickers (American Crafts, Making Memories); ink (Ranger); pen (Staedtler)

And here's how I "Framed" my layout:


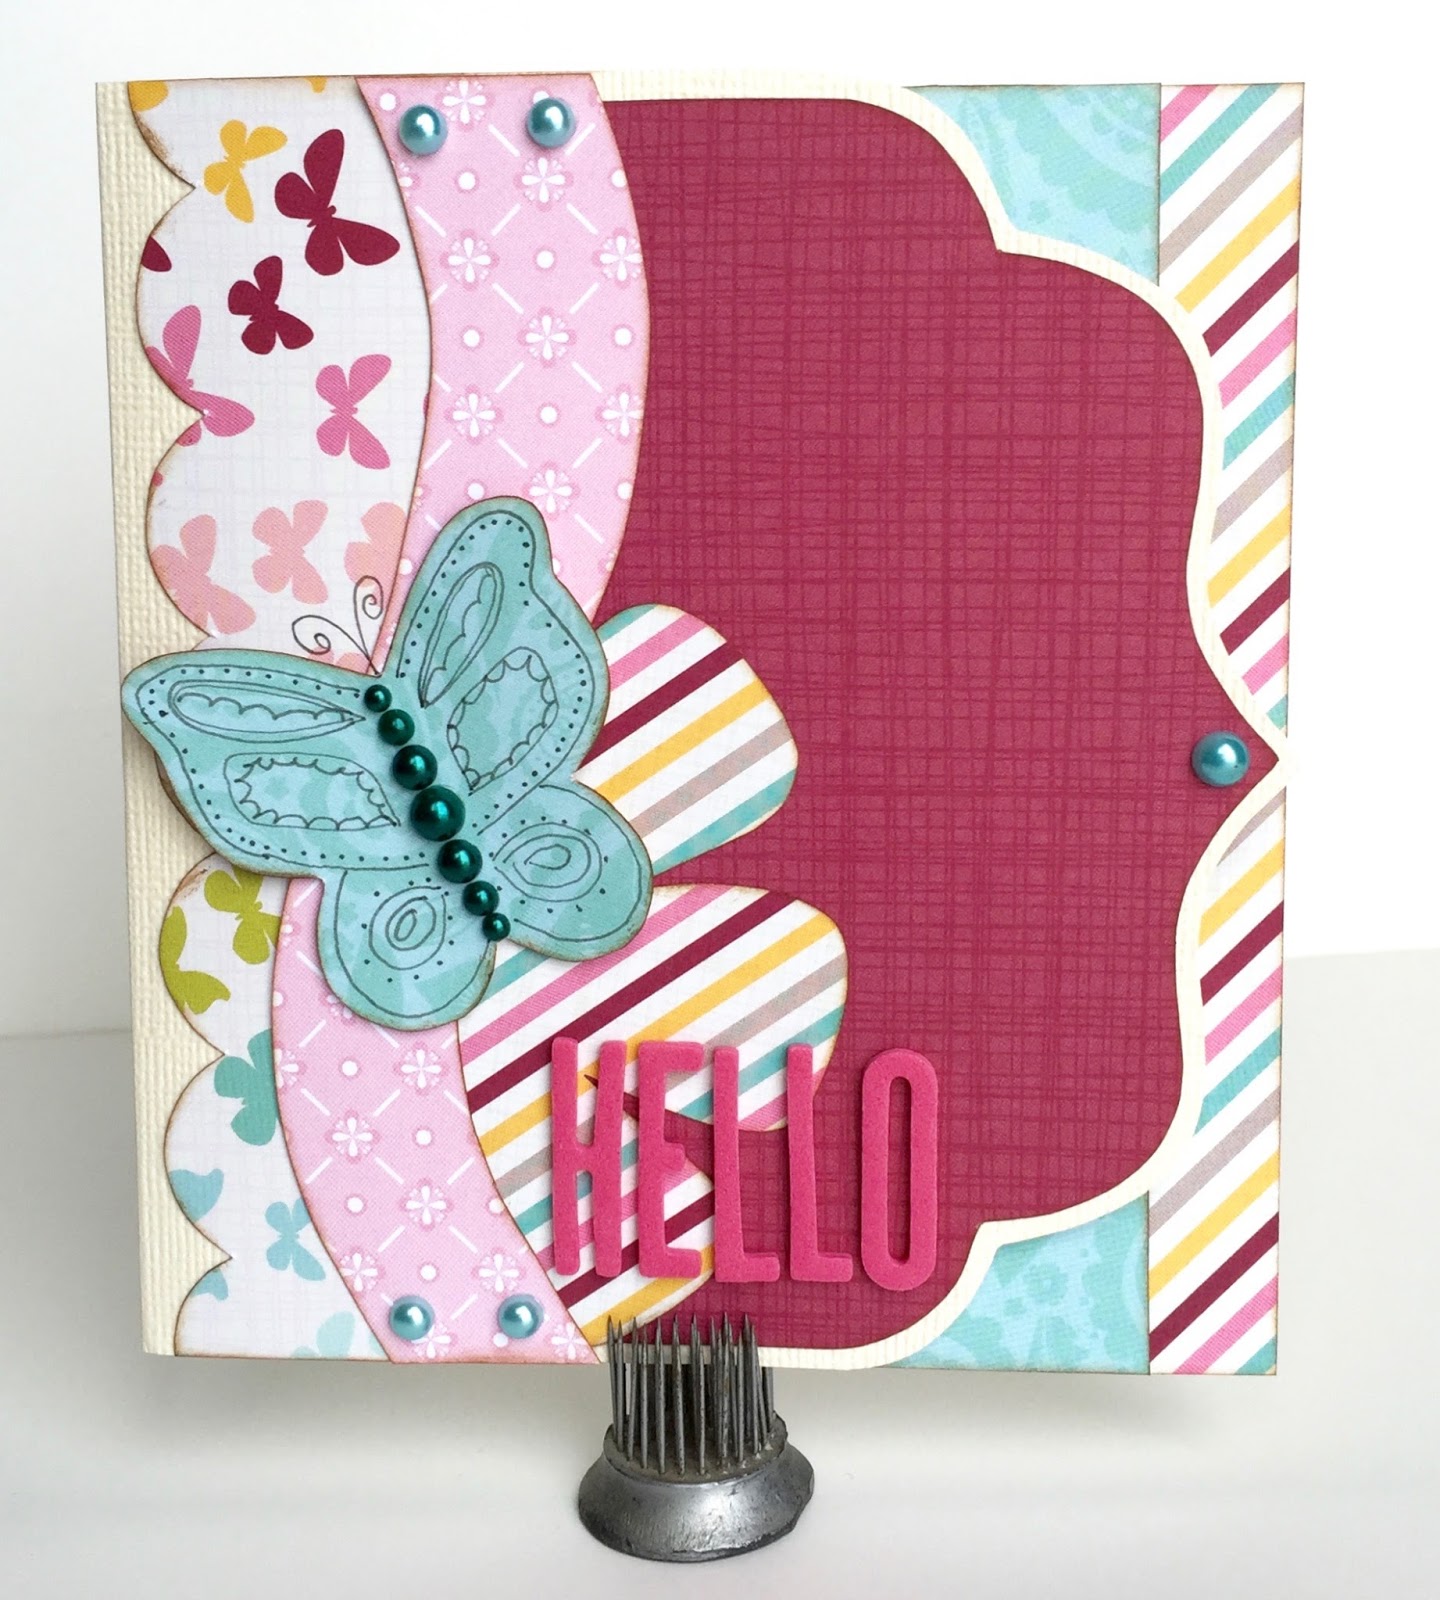
Yes, that is a grand total of three templates on my layout.  I had no idea what I wanted to do with the layout when I started.  So I threw on a few templates from the Adorn template set, along with a template from the Bracket set and built my page from there. I added lots of layers of the scalloped edge and mirrored that at the bottom of the page.  I also used one of the printed quotes from the paper kit and added that early on to make sure I left room for it.  I finished off the page with a butterfly from the Tiny Nature set and a few flowers from the Tiny Wildflower set and a title using some alphabet stickers.  

With some of the remaining paper from the kit, I made some cards:
Supplies: Kiwi Lane's Social Butterfly paper kit; card stock (American Crafts); pen (Staedtler); ink (Ranger); stamp (Basic Grey); jewels (craft supply)
 Supplies: Kiwi Lane's Social Butterfly paper kit; card stock (American Crafts); pearl (Doodlebug); brad (American Crafts); ink (Ranger)
Supplies: Kiwi Lane's Social Butterfly paper kit; card stock, alphabet stickers (American Crafts); pearls (Doodlebug); ink (Ranger); pen (Staedtler)


The "Hello" card has a shaped edge and some detail on the inside:


Even after making a layout and a few cards, I have enough scraps of paper left to make at least a few more cards. I love how much you can do with each Kiwi Lane paper kit!

Thanks for stopping by and Happy Scrapping!!

Templates used:
Bracket 2
Adorn 3A,3B,1B
Tiny Nature 2T
Scallops 1B
Wildflower 1T,4T
Autumn 1,3,6
Springtime 2
Mini Scallops 2A

Wednesday, September 9, 2015

New Layout Using Kiwi Lane's "Birds of a Feather" Paper Kit

Hey Kiwi Peeps!  Last month I shared a layout and card using on of the new Kiwi Lane Designs paper collections.  Well, it might be a bit like a rerun, but today I also have a layout and a card using one of the new Kiwi Lane Designs paper collections.  This time, I decided to use the "Birds of a Feather" collection. I love the muted peach, yellow, green and blue paired with a brighter coral along with charcoal and white.  This mix of bold and pastel colors were just asking to be paired with some photos I had from a family field trip to Wheeler Farm in Utah.  Here's the layout I came up with:


I'm kind of loving the muted tones for the pumpkins and leaves.  It really pops against the bolder papers.  And if I haven't mentioned it before, there is a sheet of printed cards and smaller bits of printed patterns in each collection to give you a variety of options when building your page.  For example, I was able to use the peach for a few things, but it was just a small area printed on one sheet of paper.  In fact, I was able to cut the pumpkins, tree trunk, tree top, bracket, flower and tag (behind the title) all out of the same piece of paper (using both front and back).  Plus the butterfly, flower and sentiment/quote on the card.  Talk about getting your money's worth!  And speaking of cards....


This was made using the same "Birds of a Feather" collection, but this time I steered clear of the bolder colors.  Now, instead of having a bold autumn feeling, the paper has a softer spring-like feel.  I also added some sparkle.  Because I just couldn't resist! ;)  I used some glitter glue to edge the butterfly and some iridescent Smooch top coat on the edges of the flower and the leaves.  Kind of hard to see in photos, but here it is-


I love how versatile this paper collection is!  Thanks for stopping by and happy scrapping!

Templates used:

Layout:
Madison Avenue 2A,2B
Aspen Court 3A,3B
Nature 1,4
Halloween 2
Tags 1
Tiny Accents 1T
Tiny Nature 1T,4T,6T
Tiny Holiday 2T,4T
Tiny Brackets 4T

Card:
Tiny Nature 1T,2T,6T

Tuesday, January 13, 2015

Birthday Calendar with Kiwi Lane plus a GIVEAWAY!!

As I was looking through my craft supplies and considering what I'd be making for my project this month, my eyes settled on a frame that'd been sitting on my desk for a little while.  It's one of those TOLSBY frames from IKEA that you can pick up for 99 cents and it looks like this: 


You can get them in a few different colors, but I opted to pick up a few white ones to have on hand.  You could also paint them with spray paint, from what I understand, although I haven't tried it.

When I purchased the frame, I had a few projects in mind.  One of them was a flip calendar to organize important family dates like birthdays and anniversaries.  And what better way to kick off the new year than to be a little more organized!  So, I grabbed a few basic supplies along with my Kiwi Lane Designs templates and got to work making my calendar.  And this is what I came up with:

Each page is made with a lightweight chipboard that has been covered with pretty paper.  If you don't have any chipboard on hand, a cereal box works as a great alternative.

I used a few of the Tags templates.  I did have to trim off about 1/4" to make them the right size to fit in the frame.  Here are a few pages:


And, of course, you have to make the back pretty, too.  ;)  I used some scraps and a scallop template to add layers.


I finished up by decorating the base of the frame with a few flowers.

The whole project was fairly easy and was pretty fast.  It would be a great Saturday project!  And a cute way to start your year with a bit of organization!  

Enter to win this set of Tiny Celebrate Templates!!

And what's better than a new project for the new year??  New supplies!! How would you like to win a set of templates to start your year off right?  Well, just leave me a comment telling me what project you are working on and you will be entered to win a set of Tiny Celebrate templates (like the ones pictured above)!  I'll even give you an extra entry if you start following my blog and let me know in your comment (one comment will work for everything!)  And if you are already a follower of my blog, let me know in your comment. :)  You have until Monday, January 19, 2015 at 11:59 p.m. MST to leave your comment.  I'll randomly choose a comment and announce it on Wednesday, January 21st.

Thanks for stopping by and Happy Scrapping!!

Template list:
Tags 5, 6, 7
Adorn 3A, 3B, 1A, 1B
Tiny Accents 1T, 2T
Tiny Celebrate 4T
Tiny Shapes 3T, 7T
Tiny Tags 1T
Delight 1, 2
Tiny Brackets 2T
Tiny Nature 1T

Supplies:
Patterned paper- Simple Stories
Burlap paper- DCWV
Chipboard alphabet stickers, gray card stock alphabet stickers- American Crafts
Glitter alphabet stickers- Making Memories
Green card stock alphabet stickers- Scenic Route
Eyelets- WRMK
Small epoxy dots- Teresa Collins
Flower punch- EK Success
Ink- Ranger
Circle Punch- Marvy Uchida
Ribbon- Fancy Pants, Pebbles, AMM, May Arts, Polar Bear Press, Personal Sentiments

Wednesday, May 7, 2014

Cards with Kiwi Lane and Fancy Pants Designs

Howdy peeps!  I just thought I'd pop in with a few cards I made... if you're here from the Kiwi Lane blog for a few more details on the "how-to", keep on reading... :)

This month for Kiwi Lane, I was able to work with the super versatile Nautical collection from Fancy Pants.   I love the colors in this collection- it's filled with red, orange, yellow, navy blue, black, sky blue, turquoise, gray, white, cream... do you see why it's so great?!  And I love that, even though there are a lot of different colors, they all mix and match really well.  Now, don't be put off by the "Nautical" title... some of the papers have a very nautical feel to them, but others are summery, some are beach-y and all of them are fabulous!  It was a fun collection to work with!!

Here are the cards I made:

"Happy Travels"
Card size: 5" x 7"
Supplies: paper, letter stickers (Fancy Pants Designs); washi tape (Freckled Fawn); twine (Lillybelle's Paperie on Etsy); pearls (Doodlebug); button (craft supply); ink (Ranger)

I used the airplane that was already printed on the paper to my advantage, making sure to leave it in the top left corner of the card when I was trimming my paper.  I then used a large Floral template to do the bottom layer of the sun (the orange with white dots).  I took of strips of washi tape, folded the strips onto themselves and used those for the next layer of the sun, followed by a yellow sun shape from the Tiny Accents accessory templates.  I made a washi "flower" on top of the yellow sun (you can watch THIS YouTube video to see the gist of how), then finished off my layers with a button and twine.  I made my "sun" look like it was setting over the ocean by using the wavy border from the Sincerely template set.  Note:  the card border template sets are only 5 1/2" long and this card is 7" long. To elongate your borders, match up the ends of a set to make one longer, continuous border.  I then added the tiny alphabet stickers that were in my packet of Fancy Pants goodies and some golden colored pearl dots and.... TA DA!!  One card that has lots of layers, but not as much bulk as you'd think.  And super cute, no? ;)

Templates used:
-Floral 1
-Tiny Accents 4T
-Sincerely 3A & 3B

"Enjoy"
Card size: 5 1/2" x 5 1/2"
Supplies: paper, sticker (Fancy Pants Designs); flower (Prima); pearls (Doodlebug, Pebbles); ribbon (Offray); ink (Clearsnap); die cut machine and embossing folder (Cuttlebug)

This is a gate fold card and opens in the front- to achieve this look, layer your flowers and only adhere half of the bottom flower to the front of the card over the seam to open the card.  For the ribbon, I figured out how much I needed and cut that amount.  I started layering my flowers and tied the ribbon around the card after I'd adhered the two red flowers but before the white one was attached.  I tied the ribbon around the card, adjusting until I had the bow where I wanted it, then adhered the white flower over the ribbon, thus attaching it to the card without a ton of adhesive.  Make sense?  I hope so!  If you're ever confused about my instructions, please feel free to email me!!  glo(underscore)owens(at)man(dot)com 

Templates used:
Tiny Bracket 1T
Tiny Accents 2T
Tiny Floral 2T

"Oh, the Places You'll go!"
Card size: 4 1/4" x 5 1/2"
Supplies: paper, stickers, flair (Fancy Pants Designs); pearls (Doodlebug, Pebbles); ink (Clearsnap)

I used the edge of the chevron template in the Delight template set on the card base to create the chevron bottom.  Here's a little bit of a better view:
To make sure the chevron design on the edge stood out, I used the leftovers from another cut to add to the inside of the card for another layer of interest.
I could have used just a straight edge on the inside of the card, but I already had this cut, and who doesn't like to use every little bit? :)  I used some more of the tiny stickers to spell out "Oh, the Places You'll Go!"  I thought this card would be a great one for graduation- 'tis the season, right?

Templates used:
Tiny Brackets 1T
Delight 4, 6

So, even though this "Nautical" collection of scrappy supplies is "supposed" to be focused on water-related events, you definitely don't have to use it for that!! In fact, we should probably try to use our scrappy supplies beyond the invisible parameters set for them a little more, doncha think? 

Thanks for stopping by and Happy Scrapping!

Wednesday, April 9, 2014

Ideas to Inspire with Kiwi Lane

Good Morning all!  It's my turn for the latest installment of Kiwi Lane's Ideas to Inspire.... So are you ready to be inspired?  Good!  Let's get started!

This month at Kiwi Lane, we have the awesome privilege of working with the fabulous My Mind's Eye!  Eeeek!  I'm so excited!! Hence, the "Eeeek!"  Now, if you have never worked with any of My Mind's Eye's stuff, I suggest you find your nearest crafting/scrapbooking store and get your hands on some- you won't be disappointed! 

Now, I don't know about you, but I seem to put off scrapbooking birthdays... I think it has something to do with the feeling that I do the same thing over and over.  Well, this time I took that feeling of doing things over and over and ran with it.  Here's the theme for today's ITI:

~Use numeric repetition as a theme throughout your page.~

Here's the layout I came up (using My Mind's Eye's Now & Then Milo):
Supplies: patterned paper (My Mind's Eye and Scenic Route (background)); die cuts, chipboard, washi tape, letter stickers, epoxy stickers (My Mind's Eye); stamp (7gypsies); ink (Ranger, Tsukinedo); twine (Lilybelle's Paperie on Etsy)

Templates:
Spook Alley 3A, 3B
Wacky 3, 3T
Celebrate 1, 2, 5

The photos are from my son's 3rd birthday.  I used the number "3" in the title, but also used other three's throughout the page... can you find them all? ;)  Here's the list, in case you missed any:
- Three "3"s- one in the title, one at the top of the right page and the candles on the cupcake that resemble III (Roman numeral 3)
- Three burst shapes from the Wacky Accessory set along the bottom of the layout
- Groupings of three things: 2 balloons and a cupcake; small burst shape from the Tiny Wacky set (top of left page), "3" and "cute" die cut; title grouping that has a chipboard shape, the large "3" card and the tiny letter stickers
- There are three groupings of three things
- Three lines of journaling


That's right, peeps!  I even went so far as to emulate the theme in the number of lines for my journaling!

I will point out that I didn't use three photos on my two page layout (and really, when have you EVER seen me use so few pics on a two pager??).  But, I did keep the number of photos in an odd numbered grouping, which is aesthetically pleasing and worked well for the layout.

While the method of using numeric repetition can be quite effective, use it in small doses.  Meaning, it works better for small single digits, rather than larger numbers.  I love the look of this, but I'm certainly not going to use it for my hubby's thirty-something birthday pics. ;)

Now, can I just mention the paper and embellishments from My Mind's Eye's Now & Then Milo collection!  It is SUCH a versatile collection!!  The colors of blues, grays, greens and yellows make it pretty much the perfect pallet for both girl and boy themes, not to mention everything in between.  There's also a touch of metallic silver in the collection- both on the paper and in the embellies (brads, die cuts, printed chipboard, epoxy shapes).  It's not that over powering blinged out silver, though.  It's a soft, subtle touch of silver.  And it works for everything!  The paper itself is that heavy card stock that we have come to know and love from MME and, let's face it, we expect it from them.  The prints in the collection range from classic damask to small floral to geometrics to anchors- seriously.... so versatile!!  I LOVED working with this collection!  So much so, that I chose to use my leftovers from this project to do my Write From the Heart with Kiwi Lane  at the end of the month.  So be watching for that one!

I hope this inspired you to do something repetitive on your pages!  I'd love to see what you come up with-don't forget to post your creations to the Kiwi Lane Facebook page!  And link it here in the comments, too, please!

That's it for today.  Thanks for stopping by and Happy Scrapping!

Wednesday, March 5, 2014

Ideas to Inspire with Kiwi Lane and We R Memory Keepers

Once upon a time, I was a fun mom and did lots of fun artsy craftsy things with my kids… mostly because I had a little girl who had not reached the teen years and still liked me.  Now I have a little boy who doesn’t want to do anything that doesn’t involve a circuit board.  *sigh*  Anyway, when I was a fun mom, we spent an afternoon making tie-dyed paper using food coloring and shaving cream.  If you've never seen this process, go HERE  and take a gander.  It’s fun and messy!  And we ended up with some cool looking card stock that looked like this:
I had never used it because it isn’t acid free or safe for scrapbooks and looked a little too juvenile to be paired with the cards I usually make.  So it sat in a paper bag for a few years until I pulled it out a few months ago.  It was sitting on my desk, waiting to be turned into something wonderful, when my new punch board arrived, along with some cards from the Hip Hip Hooray! Albums Made Easy Card Set and matching twine.  And my tie dyed paper matched!  (Well, close enough.)  So I set to work making some candy boxes. If you don’t know how the punch boards work, you need to head on over HERE and check out the videos!  Again, I am using the Candy Box Punch Board, but there are many others.  It’s super easy, as the instructions for the boards are printed right on them.  I cut my paper to 7” by 11”, lined up the paper, punched and scored as instructed, flipped the paper, punched and scored some more and this is what it looked like:

I used some super strong double sided tape to make my box and it looked like this:
Whenever my kids have a friend birthday party to attend, I encourage them to give their friends art supplies.  A long candy box is perfect to house some pencils (out of the packaging), a glue stick (again, out of the packaging), and some erasers!
After I stuffed my box and closed the ends with baker’s twine, I used a card from the Albums Made Easy Card Set for a tag and decorated with some templates like so:
I still had lots of the tie dyed paper left, and I wanted to do a birthday themed card and envelope set, so I used my Envelope Punch Board to make an envelope for a 3 1/2” by 4 1/2” card (the measurements you need are right on the board- super easy!).  The envelope looked kind of boring, so again I used my Kiwi Lane templates to decorate it:

Then I used another card from the Albums Made Easy Card Set for the basis of a card.  I simply matted it with some polka dot paper, chomped the corners with my WRMK Corner Chomper and put the card and mat on a 7” by 4 1/2” card base (folded in half, of course, to make a 3 1/2” by 4 1/2” card):
Here’s the final result of my tie dye paper crafting, with the help of my Kiwi Lane templates and some We R Memory Keepers tools:
I hope you enjoyed my project- and I hope it inspired you!

Templates used:
Happy Trails 1B
Tiny Accents 4T
Tiny Celebrate 1T, 4T, 6T
Tiny Shapes 7T

Delight 1

Wednesday, February 12, 2014

Ideas to Inspire with Kiwi Lane and Hemptique

Happy Wednesday!  I feel like I was just doing a blog post... maybe because this is my third one in four weeks... a rarity, for sure!  Hope you're not too tired of me yet! ;)

For this installment of Ideas to Inspire for Kiwi Lane, I was given the opportunity to work with a company I've never worked with before. Gasp!  What?  A crafting company whose product I don't already have in my stash?!  Seriously.  It happens.  And much more often than people may think.  Especially after they view my wall-o-supplies that lines the dining area in our house.  One day I should share that with the world.  But not today.  Today, I get to share with you wonderful product from Hemptique!

I was, oh, so happy when I was sent some of Hemptique's metallic hemp cord!  This is what it looks like:
I had lots of visions of the billions of projects I could do with it, but then realized that I had to narrow it down just a bit.... to one project, to be more accurate.  So I decided to use it like I would use embroidery floss and stitch on a layout.  Hemp cord is a little bit thicker and stiffer than embroidery floss, but it's still fairly easy to work with.  Here's the layout I came up with:

I framed my page using the Kiwi Lane Templates:
And then after I traced, cut, inked and replaced:
Supplies: patterned paper, cardstock stickers (My Mind's Eye); sequins (Teresa Collins Design); cord (Hemptique); stitching template, letter stickers (American Crafts); paper flowers (Prima); pen (Staedtler); ink (Ranger)

(I used My Mind's Eye's Lucky in Love collection.... and yes, I changed my mind about the background paper after I had everything laid out- it happens a lot.  One of the advantages of using the templates!)

I started working with my Hemptique cord and realized that it wasn't quite the color I wanted- all the hemp was natural color and the metallic strings are intertwined.  I knew I wanted the metallic, but decided to see if the hemp would take color.  So I conducted a little experiment- I put a length of cord in a plastic baggie and sprayed some ink in the bag and squished the cord around in the ink.  And it worked!  A little too well, actually.  I ended up rinsing the cord to remove some of the blue color because it was so dark it looked almost black- pretty, but not quite right for my project.

So what was I going to stitch?  I wasn't sure, but then I saw an advertisement for a sale on fabric at a craft store.  Muslin and tulle.  I thought that they would be fairly easy to cut and stitch, so off to the store I went!  I made my huge purchase of 12" of white muslin and 12" of pink tulle (a whoppin' 56 cents worth of fabric) and ran home to get to work!  Seriously, kids, I don't remember the last time I was this excited to work with fabric and string.... probably never.
I started by tracing the flower shape from the Sweetheart accessory set onto the muslin, cut it out, then realized that I didn't really want to stitch around a flower shape.  That's too complicated.  ;)  So I opted to use the larger circle in the Shapes Tiny Accessory template set.  I cut a layer of muslin and a layer of tulle (netting) and also a circle of pink lightweight cardstock to add some stability.  I used the smaller circle from the same set to pierce holes to stitch through.  Towards the end of stitching the circle, I thought it would be fun to make the circle into a shaker box... sort of.  So I threw some sequins in between the muslin and tulle and finished stitching.  The circle became the middle of the large flower.  I tore strips of the white muslin to run through the entire layout and stitched some pink x's on the border.
While I never would have thought to use hemp cording on a scrapbook page before this, I'm certainly glad I got to try it!  I love the way it turned out!!  Hemptique makes other cording, string and yarn out of natural fibers like cotton and bamboo- some are natural colored and some are dyed.  They even have some cute looking bamboo bakers twine that I'm looking forward to getting my hands on some!

Thanks for stopping by and happy scrapping!  Don't forget to come back tomorrow for the announcement of the winner from the Kiwi Lane blog hop!

Templates used:
  • Sweetheart 1, 3
  • Clara 1A, 1B, 3A, 3B
  • Tiny Shapes 3T, 7T
  • Thoughtful 2A, 2B
  • Strips
  • Photos
  • Tiny Photos